shooting log
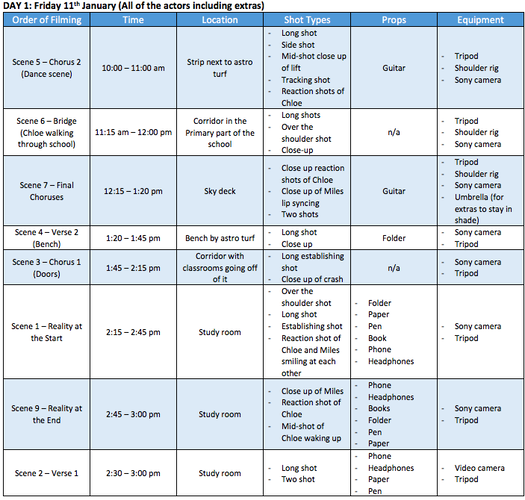
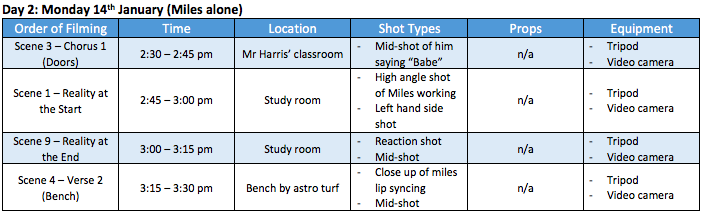
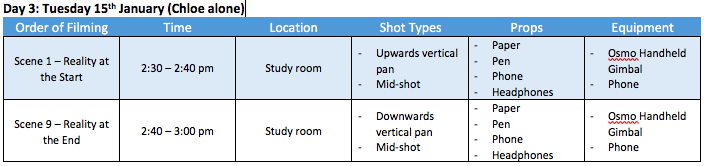
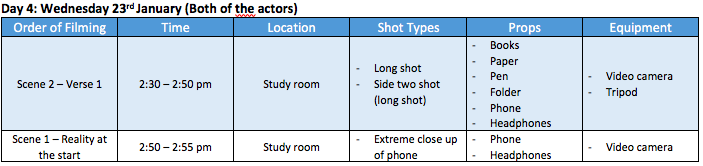
Since I was only shooting in one location, I decided that I could film my music video in one day. This then gives me time to shoot any pick-up shots (if need be).
To save the time of both me and my actors I decided not to film in chronological order. It saves time as if I did film in chronological order then the actors would have to come to the location over five times, which may be difficult as some live far away from it. On the other hand, a possible issue with this plan is that the lighting on some of the shots that I film later might be darker even though the scene is meant to come before.
Furthermore, my filming was made more difficult as I had to borrow a lot of the equipment from the schools media department. This meant I was cut short for time for equipment to be free.
After brainstorming through December, I began preparing for my music video shoot on Friday 11th January.
|
|
Shooting my music video
Overall my music video shoot went well. My reasons for this are:
- All of my actors turned up on time
- The extras picked up the dance quickly
- I had storyboarded and planned the video well, allowing both me to clearly tell the actors what my picture was
- The main actors managed to portray my idea well
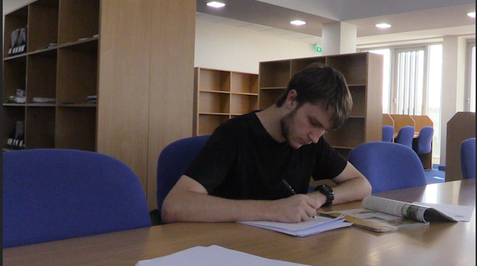
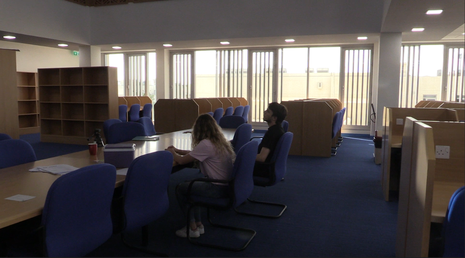
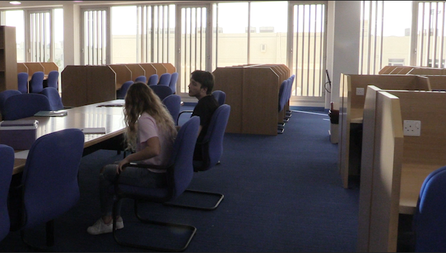
- The building which I wanted to film the inside scenes was locked so I couldn't get in. To fix this I phoned one of the maintenance men who could open it. Once inside everything else was open. So overall, this issue was sorted quickly.
- The camera started overheating when we were filming the final choruses. I had thought about this when planning my music video but due to the time of the day I could not keep the camera in shade without the shadow being in the shot. So this added on time to my shoot as I had to wait for the camera to cool down.
- Due to the outside lighting it was very difficult to see the camera's monitor, which left me blind on the framing on a few of the shots.
- The Sony camera batteries ran out and the charger wouldn't work. To fix this I luckily had a backup camera (Canon XA25), so I was able to finish shooting as planned.
- The gimbal camera wouldn't stabilise. Addressing this issue, I managed to shoot the scenes where I needed it on a shoulder-camera, but unfortunately this resulted in shaky footage. I may be able to shoot the scene again as a pick-up shot but it would be difficult to organise the extras to come to the location again.
|
When the gimbal stopped working I thought I would have to leave the scenes and just have stationary shots. But then my media teacher bought the Osmo Handheld Gimbal. I was able to use this for the vertical pans.
|
Initial issues I noticed about the footage
- Looking back over the footage I noticed that the actors lip-syncing on the close-up shots isn't very clear. This issue can be sorted by scheduling a time for him to come in and re-shoot those scenes.
- On a few of the scenes (in particular the dance scene, on the second chorus) the lighting is quite dark. However, this can be sorted in post-production.
- In some of the footage you can see the extras in the background. I didn't see this on the day due to the lighting preventing me from seeing the monitor. When I edit my video I will just have to trim/cut the parts where you can clearly see them.
organising my footage
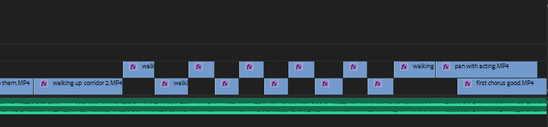
To make editing easier I will go through my footage and delete any clips I know I can't use and appropriately name the other. I will also place them in albums by scene.
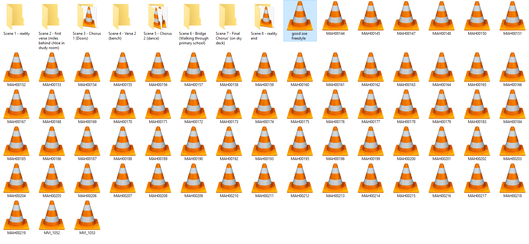
This is when I started organising the clips.
|

I have finished organising the folders and videos. This will make finding specific clips
|
Editing my music video
To edit my music video I will be using the Adobe Creative Cloud Suite, mainly Adobe Audition and Adobe Premiere Pro.
Fixing the song's audio
Before I start placing my clips together I need to fix the audio on the song. At the moment it is peaking. To fix this I used the Hard Limiter. From this the audio is loud enough but at the same time, the audio isn't distorted.
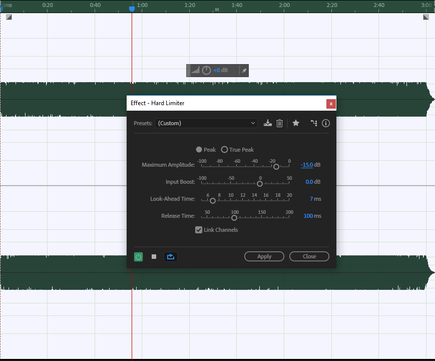
These are the settings that I changed the audio too.
placing clips
After organising all of my footage into the scenes I started uploading and editing them onto the audio, this was done scene by scene. The order I did this was:
- Scene 5 - Chorus 2 (The dance scene)
- Scene 6 - Bridge (Chloe walking through school)
- Scene 9 - Reality at the End
- Scene 7 - Final Chorus (Sky Deck)
- Scene 3 - Chorus 1 (Doors)
- Scene 4 - Verse 2 (Bench)
- Scene 1 - Reality at the Start
- Scene 2 - Verse 1 (Study Room)
- Scene 8 - Reversal (Back to Reality)
syncing my editing
The scene that required the most precise music editing was Scene 6. This is because it required clean, quick cuts to the music.
In Scene 6, on the lyrics "1,2,3,4,5,6,7,8,9,9,9,9" - I have planned to have a cut on every beat/lyric. Each cut will be of a different shot. I decided to alternate between:
In Scene 6, on the lyrics "1,2,3,4,5,6,7,8,9,9,9,9" - I have planned to have a cut on every beat/lyric. Each cut will be of a different shot. I decided to alternate between:
- Shots where Chloe is walking towards the camera
- Shots where Chloe is walking away from the camera
- Over the shoulder shots - which I filmed with the shoulder cam
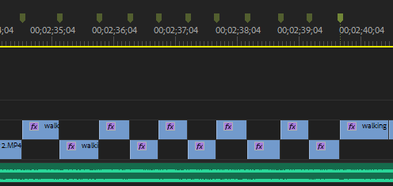
One part that helped me hugely was using markers (they are the yellow arrows at the top). These helped me line up when each number started. I then simply had to drag the footage to the each one.
|
I found it easier to separate the clips so I could clearly see where each clip starts and stops. In addition, it made it easier for me to compare the different clips' colour balances.
|
speed and reverse
|
The scene that I used speed on is Scene 3. This is partially to make sure that all the clips fit within the time frame but also to add to the comedy feel of this scene. My aim for this scene is to make it look like a classical cinema scene, which would mean speeding up the footage.
The process for doing this was mainly trial and error, deciding on what speed to use. |
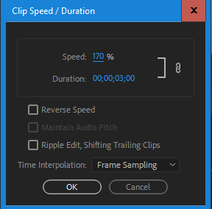
In the end I decided on using 170%
|
|
To reverse a clip I used the same process, but this time clicked reverse speed. I used this effect on Scene 9, to help enhance the transition between the female characters dream and reality.
|
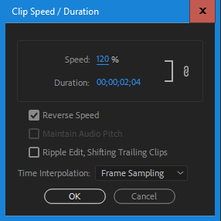
In addition to reversing the shot I also sped it up to 120%
|
continuity
|
Whilst going through my clips I had to be careful with continuity, this is one example.
This was one strength of having multiple crew members as they were good at helping me spot continuity errors. |
|
On the other hand, I did have two issues when I was editing. This is partially because when I filmed the following scenes I was the only crew member. These were:
Scene 1:
One of the extras in the background keeps disappearing and reappearing. This is because I filmed this scene on two separate days, one of which the extra wasn't present. Although my extra isn't that visible when showing my draft music video to people of the artists target audience, most of them noticed. To fix this issue I changed the position and scale of the clips so that audiences could no longer see the extra in the background. Although this may distort the shot I originally wanted, it removes the error that I made during filming.
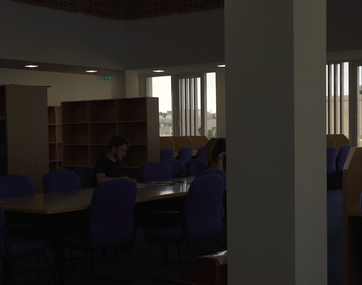
Before: The extra is behind the pillar
|
After: As I have adjusted the clip you can't tell if the extra is next to her or not
|
Scene 2:
I didn't notice during shooting that the tripod was visible in my long shot. To fix this issue I changed the position and scale of the clips so that audiences could no longer see the tripod.
I didn't notice during shooting that the tripod was visible in my long shot. To fix this issue I changed the position and scale of the clips so that audiences could no longer see the tripod.
Before: The tripod can be seen on the left
|
After: I have adjusted the footage so you can't see the tripod
|
lighting adjustments
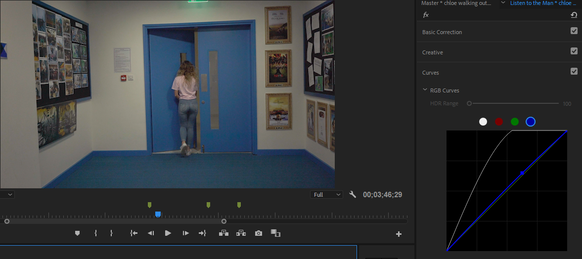
As a lot of my footage was filmed in different locations and after reshoots at different times of the day I had to use the Colour effects tool quite a lot. The majority of the time I used the curves tool and adjusted the white balance, red balance and the blue balance (on a clip on Scene 3).
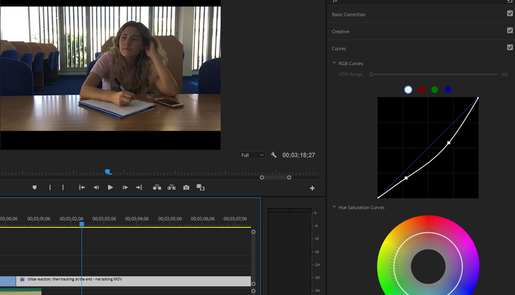
This is an example of the white balance adjustment on Scene 8.
|
This is the scene where I changed the blue balance.
|
|
Another colour effect that I used is the Hue Saturation Curves. For some of the clips I needed to make the reds stand out more, to do this I dragged the line slightly towards the red part of the wheel.
|
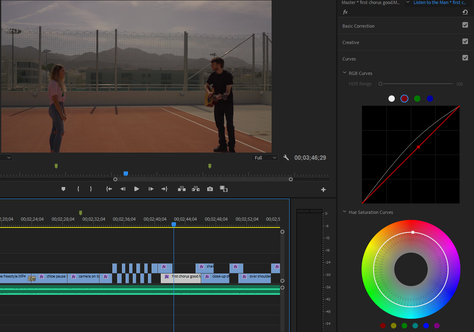
Example from Scene 7.
|
The final Colour effect that I used is the Colour Wheels and Match tool. With this tool I was able to easily duplicate the colour/lighting on two scenes. Unfortunately the tool didn't work every time, but was effective in editing Scene 3.
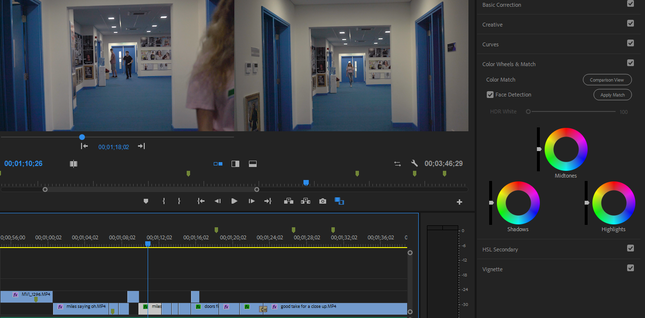
After pressing 'Comparison View' and deciding what clip I wanted replicating, I then selected 'Apply Match'.
sound adjustments
At the start of the music video there is a section where I planned for the audio to sound like it was coming out of the headphones. To learn how to do this I watched a YouTube video on it - https://www.youtube.com/watch?v=Mj-TG3zRq_8
From this video I learnt that if you add a highpass filter to the audio it will make it sound like it was coming through a phone or in my case headphones. In addition, to this I also learnt that if you put a lowpass filter over audio it will sound like it is underwater (which may be useful in future video editing).
From this video I learnt that if you add a highpass filter to the audio it will make it sound like it was coming through a phone or in my case headphones. In addition, to this I also learnt that if you put a lowpass filter over audio it will sound like it is underwater (which may be useful in future video editing).
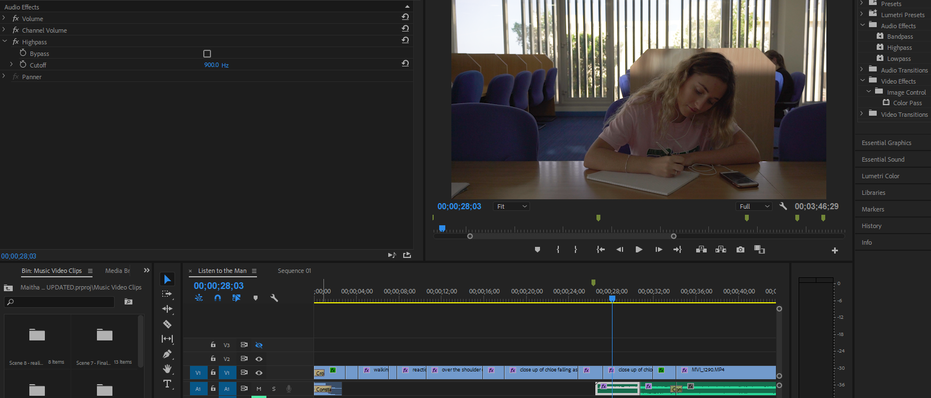
I added the highpass filter and changed the settings until it sounded right. I changed it to 900 Hz.
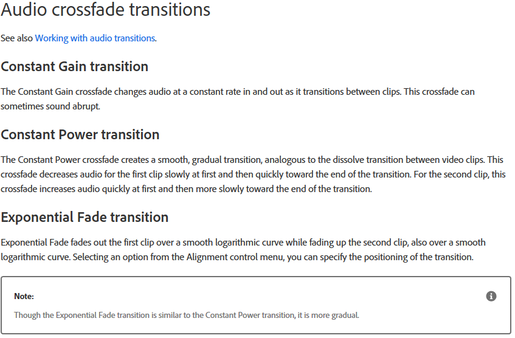
After adding the highpass filter I thought that the transition between this audio and the normal audio was too abrupt. Therefore I needed to add a fade out. To find out how to do this I read the following article - https://helpx.adobe.com/premiere-pro/using/audio-effects-transitions.html - in particular the section about 'Audio Crossfade Transitions'.
|
From this information I found it a lot easier deciding which effect to use. In the end I used a Constant Gain filter to fade the audio out.

|
adding an after effect to scene 3
As Scene 3 links to classical cinema I have decided to use a filter to replicate this. I watched the following YouTube video to guide me on how to do this (https://www.youtube.com/watch?v=cNfaRFcOV5c). From this video I then downloaded the filter off of Vimeo and placed it onto the section of my music video (https://vimeo.com/29185333).
|
|
After evaluation, I don't think this particular filter works well with the scene. As I still feel the filter idea is still good, I will use different software, like Adobe After Effects. Since I have never used Adobe After Effects before I had to rely on YouTube tutorials, in particular - https://www.youtube.com/watch?v=zZted8NDWE8. Below I will list the steps I went through to create the final product.
|
Step 1: Importing
The first thing I did was import the valid footage onto After Effects. I did this by saving the doors sequence as a file and then importing it into After Effects.
The first thing I did was import the valid footage onto After Effects. I did this by saving the doors sequence as a file and then importing it into After Effects.
Step 2: Tint and Curves
I then added an adjustment layer to the file and named it 'CC' as instructed by the video. After that I then went onto Effect>Colour Correction>Tint. With the tint selected I changed the white to a sepia looking colour. With the tint added, I needed to create contrasts in the footage. I did this with the Curves tool, which I accessed through Effect>Colour Correction>Curves
I then added an adjustment layer to the file and named it 'CC' as instructed by the video. After that I then went onto Effect>Colour Correction>Tint. With the tint selected I changed the white to a sepia looking colour. With the tint added, I needed to create contrasts in the footage. I did this with the Curves tool, which I accessed through Effect>Colour Correction>Curves

Adjustment Layer
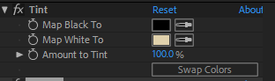
The changed tint
|
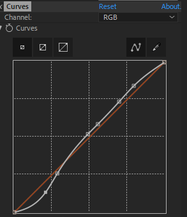
The changed curves
|
|
Step 3: Final Output
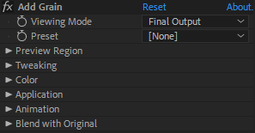
The colour is now sorted. Next I needed to add the classic cinema effect. The first step to doing this was going onto Effects>Noise & Grain>Add Grain. After I added the grain I changed the settings from 'Preview' to 'Final Output'. |
Final Output Grain
|
|
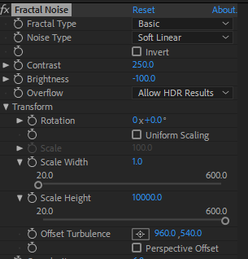
Step 4: Fractal Noise
Now on my new layer, I then went onto Effects>Noise & Grain>Fractal Noise. Once on this effect I used the same settings as the YouTube video. |
|
|
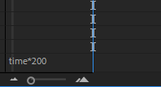
The filter is now in place but it doesn't move. To change this I pressed Alt on my keyboard and then selected the stopwatch next to 'Evolution' at the bottom of the 'Fractal Noise' tab. Continuing on from what the video said I then typed in 'time*200'. I then decided to experiment with this effect and my footage, keeping in mind that if I increase the number it will make the effect faster and vice versa. From this I decided to keep the effects the same.
|
|
|
Step 5: Vignette
After adding a new layer and placing the vignette, I then subtracted it so that the clip was still visible. |
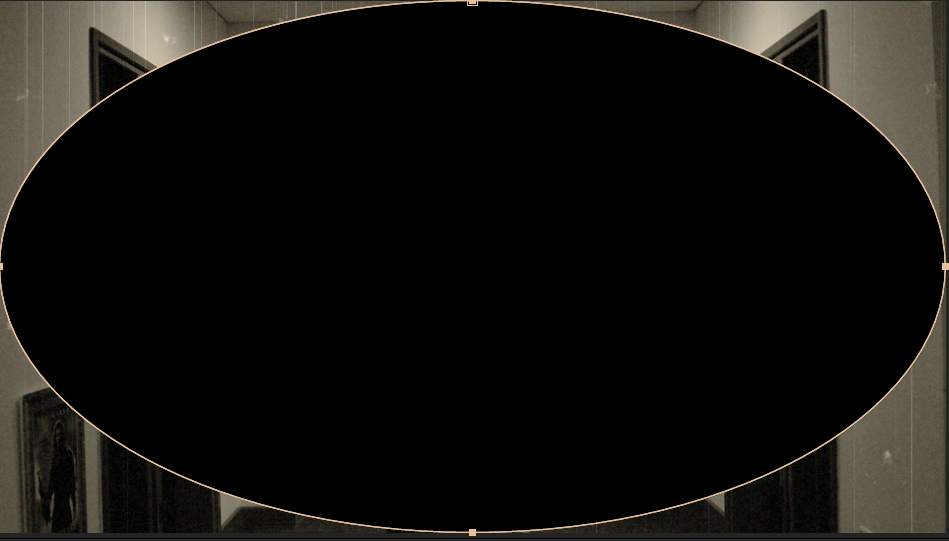
Before I subtracted the vignette layer
|
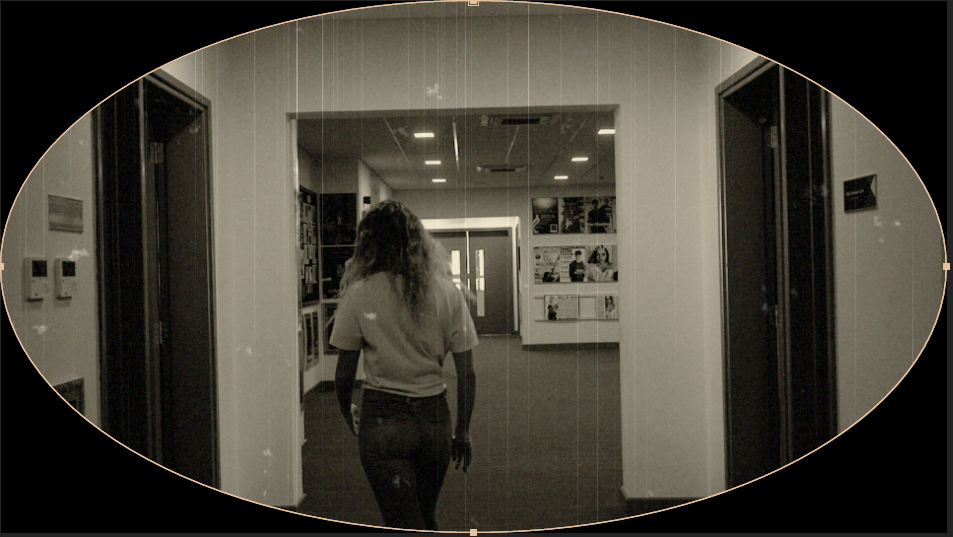
After I subtracted the vignette layer
|
|
After changing the opacity and feather the vignette looks more realistic.
|
|
|
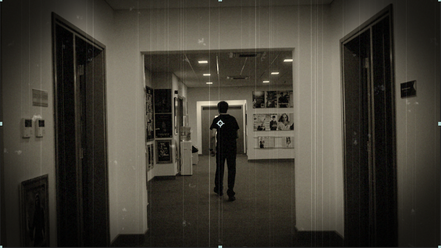
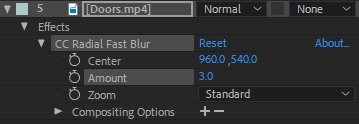
Step 6: Blur
The final step I took to create the classical cinema look, was to add a blur. I did this by going onto Effects>Blur and Sharpen>Radial Fast Blur. I then changed the blur to a lower number so that the viewers could still clearly see the music video. This filter helped the footage look realistic. |
|
Now that the footage is finished I can upload it back into Premiere Pro and watch it with the audio.
